Connect one end of the RS232 Interface Cable (supplied) to the PC’s serial port. Plug the other end of the cable into the DB9 connector located inside the iSIC. Apply power to the iSIC. If AC power will be used to power the system, connect the red and black battery leads inside the iSIC or connect the A11 Battery Float Charger.
It may be necessary to use the iChart Terminal (Advanced | Terminal) to switch the logger to communicate via RS232:
Open iChart and select Advanced | Terminal. Connect the data logger to a COM port on the computer and then select that COM port in the dialog box and Direct connect as the connection type. Click Connect and a white window should appear.
- Power the iSIC (or cycle power by removing both fuses)
- When NexSens iSIC appears in the Terminal, type “Esc-2-3-2”
- Look for a message that ends with %232. If one doesn’t appear, re-cycle power and repeat.
- Once %232 is the last line in the Terminal, close the Terminal
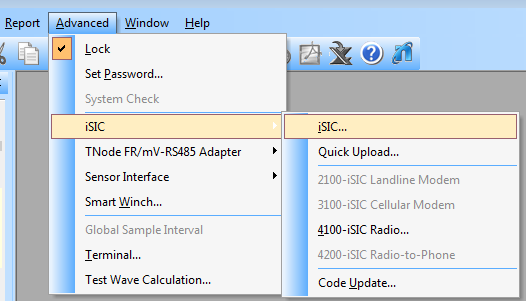
Open iChart and select Advanced | iSIC | iSIC from the file menu.

Figure 1: Advanced | iSIC | iSIC
This will open the iSIC Setup window.Check the COM Port field. If the RS232 cable connecting the iSIC to the computer is located on a port other than COM1, click on PC COM Port and select the correct COM port. All other configuration settings can remain as 9600 baud N81.
Next select Direct connect from the Connection drop-down menu if it is not already selected. Finally the iSIC Address field can be left at the default of “0”.
Once the configuration has been set correctly, click on the Connect button. Once iChart has opened the COM port, the Connect button will now say Disconnect. If a message appears saying “failed to open port”, make sure no other programs are using the COM port. Also, if an iChart program is open, it may be interrogating instruments connected to that port.
Click on the General tab and iChart will read the iSIC configuration information. After it has done so, make sure the firmware, iSIC time, and main battery voltage fields are present. Check the Change Address box and enter a new value for the iSIC Address. When a new address has been entered, click Apply.

- Figure 2: iSIC Setup window, General tab
iChart will pop up a message stating the change was successful. Go back to the Connection tab and click Disconnect. After disconnecting and closing the iSIC Setup dialog box, cycle power once more by again removing the fuses.
REV: 13G12

