1. Gather the following tools:
- small Phillips head screwdriver
- small flathead screwdriver
- adjustable wrench.
2. Open the black junction box on the solar panel by using the small Phillips head screwdriver to remove the cover plate.

Figure 1: Opening the Junction Box
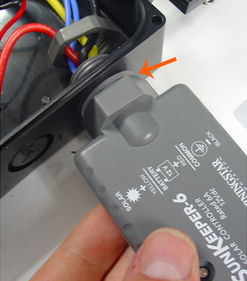
3. Insert the regulator through the hole in the black box of the solar panel and tighten down the gray nut. Be sure the white gasket is between the regulator and the outside of the black box. Rotate the regulator by hand little by little while holding the gray nut with an adjustable wrench. Be sure the regulator is screwed tightly in place.

Figure 2: Inserting the Regulator
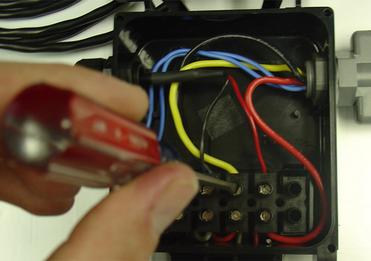
4. Using the small flathead screwdriver, connect the red wire from the regulator to the back of pin 4. Connect the yellow wire to the front of pin 3. Twist the black wire from the solar cable and the black wire from the regulator and connect them both to the front of pin 2.
Note: Be sure that all wires are making solid connections by pulling slightly to test for loose connections.

Figure 3: Connecting the Wires
5. Replace the cover plate on the junction box.
REV: 14H01

Overall good instructions. In Step 4 the instruction are missing the pin number for the black wire. “Twist the black wire from the solar cable and the black wire from the regulator and connect them both to the front of pin.” Should be pin 2.