
Set up Cellular Telemetry Using an Integrated SIM
Nimblelink modems within NexSens X-Series data loggers contain an integrated SIM card using Verizon cellular service. This integrated card is in addition to any NexSens or user-installed SIM cards in the available slot. To activate the integrated SIM card, follow the process below.
Set the Firmware Mode
Newer modem models (LE910C1-xx) available in X-Series data loggers can switch between multiple cellular firmware (e.g., AT&T, Verizon, T-Mobile, Global, etc.). The firmware used at any given time must be specified and saved within the internal settings on the modem for proper communication.
- Check which mode the modem is currently in by entering: AT#FWSWITCH?
- Change the mode to the Global firmware by entering the following command:
- AT#FWSWITCH=40,1 (Global)
- After sending the command, complete the update by cycling the power (turn off and on) on the modem.
- AT#FWSWITCH=40,1 (Global)
- Resend the AT#FWSWITCH? to ensure a successful change.
- Enter and send the following command (AT+WS46=28) to force the modem to only look for 4G networks.
- By default, modems will look for available 2G and 3G networks, which are becoming obsolete. Limiting the connection to 4G networks substantially lowers the amount of time required for the modem to connect to a network.

Figure 1: 4G-only cellular connectivity.
Activate Integrated SIM Card
- Read the current IMEI and ICCID (SIM ID). Copy and paste these values into a notepad file.
- Send the following AT commands to switch the modem to use the integrated sim:
- AT#ENSIM2=1
- Activates slot for integrated SIM card. You should receive an OK response.
- AT#ENHRST=1,0
- Reboots the modem. Wait 30 seconds before entering additional commands.
- AT+CFUN=4
- Disables phone functionality. You should receive an OK response.
- AT#HSEN=1
- Enables the “hot-swap” function to switch to the integrated SIM. You should receive an OK response.
- AT#SIMSELECT=2
- Selects the SIM slot 2 for the integrated SIM card.
- AT+CFUN=1
- Restores mobile functionality for integrated SIM.
- AT#ENSIM2=1
- Power OFF the modem.
- Wait 10 seconds.
- Power ON the modem.
- Read the new IMEI and ICCID (SIM ID). Copy and paste these values into the notepad file.
- Cellular service can be activated directly with Verizon, or cellular information can be provided to NexSens to activate the Verizon service.
Verify and Configure the Current PDP Context Settings
Once the Integrated Verizon SIM card is active, the PDP context settings must be updated.
- To confirm the PDP Context settings, select and send the AT+CGDCONT? command from the Direct Command list.

Figure 2: Response to AT+CGDCONT? command displaying the modem’s currently configured APN profiles.
- In the PDP Context field of the menu, enter the following information:
- cid
- Each cellular carrier has multiple cid’s available for different purposes (e.g., IMS services, administrative, emergency, general internet connection, etc.). The cid necessary for communication with WQData LIVE is for general internet connections only.
- 1 = Verizon
- Each cellular carrier has multiple cid’s available for different purposes (e.g., IMS services, administrative, emergency, general internet connection, etc.). The cid necessary for communication with WQData LIVE is for general internet connections only.
- cid
- PDP Type – (Type of IP address assigned to the PDP)
- IPV4V6 typically works universally; however, confirm the proper type with the cellular provider for certainty.
- PDP Type – (Type of IP address assigned to the PDP)
- APN
- Each cellular carrier has multiple APNs used for different purposes and corresponding to a specific cid. The most common APNs are available within the drop-down list.
- If the required APN is not on the list, which will often be the case, enter the proper APN enclosed in quotations.
- APN
- After entering the values, click Set. Then, a prompt will appear indicating whether the command was successful.
- Multiple PDP contexts with different cids can be set; however, the Active cid must be set for the carrier that is currently being utilized. Enter the appropriate cid (1) and select Set Active cid.
- It is recommended to read back the APN settings via the AT+CGDCONT? direct command following the change to verify they are properly listed on the modem.
Test Network Connection
After configuring the modem APN settings, test the modem’s network connection.
- Send the AT+CMEE=2 direct AT command to turn on extended error codes.
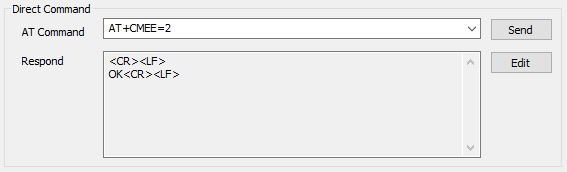
Figure 3: Turn on extended error code responses in the modem.
- Read the Signal Quality of the system to verify it is within the -51 dBm to -90 dBm range.

Figure 4: Verify the signal strength is adequate.
- Send the AT#SGACT=1,1 (for Verizon) direct commands to query the modem to connect to the network and resolve an IP address.
- Successful connections will display the IP address assigned to the modem during its connection request.
- Connections that fail will display one of many messages (facilitated by the extended error code activation in step 1). Some common ones are:
- SIM not inserted – indicates a loose or improperly installed SIM card in the modem.
- Activation Failed – generally a cellular account setup issue.
- Requested Service Option not subscribed – generally a cellular account setup issue.
- Unspecified GPRS error – typically a cellular account setup issue or an incompatibility between the network in use and the supported cell modem/antenna bands.
- Send the Custom 1, followed by the Custom 2 command.
- The Custom 1 command activates the modem and sets an HTTP connection to wqdatalive.com.
- The Custom 2 command tests the communication with WQData LIVE by transmitting null data to wqdatalive.com and seeing if a timestamp is returned.
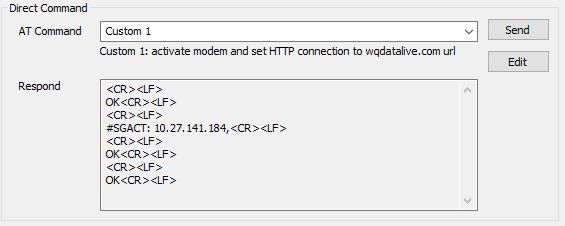 Figure 5: Successful Custom 1 command response. | 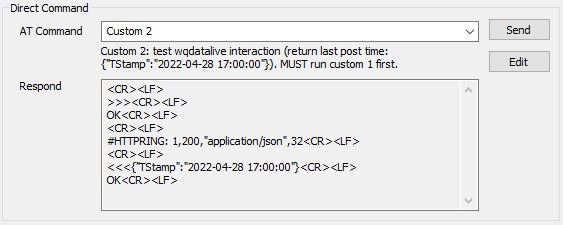 Figure 6: Successful Custom 2 command response. |
After successfully configuring the network connection, use the WQDATA tab in CONNECT to transfer data to WQData LIVE.